Transformers documentation
关键点检测
You are viewing main version, which requires installation from source. If you'd like
regular pip install, checkout the latest stable version (v5.22.2).
关键点检测
关键点检测用于识别并定位图像中的特定兴趣点。这些关键点也称为地标,代表物体的有意义特征,例如面部特征或物体部件。这些模型接收图像输入,并返回以下输出:
- 关键点与置信度分数:感兴趣点及其置信度分数。
- 描述符:表示每个关键点周围图像区域的特征,捕捉其纹理、梯度、方向及其他属性。
在本指南中,我们将展示如何从图像中提取关键点。
在本教程中,我们将使用 SuperPoint,这是一个用于关键点检测的基础模型。
from transformers import AutoImageProcessor, SuperPointForKeypointDetection
processor = AutoImageProcessor.from_pretrained("magic-leap-community/superpoint")
model = SuperPointForKeypointDetection.from_pretrained("magic-leap-community/superpoint")
让我们在下面的图像上测试该模型。


import torch
from PIL import Image
import requests
import cv2


url_image_1 = "https://huggingface.co/datasets/huggingface/documentation-images/resolve/main/bee.jpg"
image_1 = Image.open(requests.get(url_image_1, stream=True).raw)
url_image_2 = "https://huggingface.co/datasets/huggingface/documentation-images/resolve/main/cats.png"
image_2 = Image.open(requests.get(url_image_2, stream=True).raw)

images = [image_1, image_2]
现在我们可以处理输入并进行推理。
inputs = processor(images,return_tensors="pt").to(model.device, model.dtype)
outputs = model(**inputs)
模型输出包含批次中每个项目的相对关键点、描述符、掩码和分数。掩码会突出显示图像中存在关键点的区域。
SuperPointKeypointDescriptionOutput(loss=None, keypoints=tensor([[[0.0437, 0.0167],
         [0.0688, 0.0167],
         [0.0172, 0.0188],
         ...,
         [0.5984, 0.9812],
         [0.6953, 0.9812]]]),
         scores=tensor([[0.0056, 0.0053, 0.0079,  ..., 0.0125, 0.0539, 0.0377],
        [0.0206, 0.0058, 0.0065,  ..., 0.0000, 0.0000, 0.0000]],
       grad_fn=<CopySlices>), descriptors=tensor([[[-0.0807,  0.0114, -0.1210,  ..., -0.1122,  0.0899,  0.0357],
         [-0.0807,  0.0114, -0.1210,  ..., -0.1122,  0.0899,  0.0357],
         [-0.0807,  0.0114, -0.1210,  ..., -0.1122,  0.0899,  0.0357],
         ...],
       grad_fn=<CopySlices>), mask=tensor([[1, 1, 1,  ..., 1, 1, 1],
        [1, 1, 1,  ..., 0, 0, 0]], dtype=torch.int32), hidden_states=None)
要在图像中绘制实际的 keypoints,我们需要对输出进行后处理。为此,我们需要将实际的图像尺寸与输出一起传递给 post_process_keypoint_detection。
image_sizes = [(image.size[1], image.size[0]) for image in images]
outputs = processor.post_process_keypoint_detection(outputs, image_sizes)
输出现在是一个字典列表,其中每个字典都是关键点、分数和描述符的处理结果。
[{'keypoints': tensor([[ 226,   57],
          [ 356,   57],
          [  89,   64],
          ...,
          [3604, 3391]], dtype=torch.int32),
  'scores': tensor([0.0056, 0.0053, ...], grad_fn=<IndexBackward0>),
  'descriptors': tensor([[-0.0807,  0.0114, -0.1210,  ..., -0.1122,  0.0899,  0.0357],
          [-0.0807,  0.0114, -0.1210,  ..., -0.1122,  0.0899,  0.0357]],
         grad_fn=<IndexBackward0>)},
    {'keypoints': tensor([[ 46,   6],
          [ 78,   6],
          [422,   6],
          [206, 404]], dtype=torch.int32),
  'scores': tensor([0.0206, 0.0058, 0.0065, 0.0053, 0.0070, ...,grad_fn=<IndexBackward0>),
  'descriptors': tensor([[-0.0525,  0.0726,  0.0270,  ...,  0.0389, -0.0189, -0.0211],
          [-0.0525,  0.0726,  0.0270,  ...,  0.0389, -0.0189, -0.0211]}]
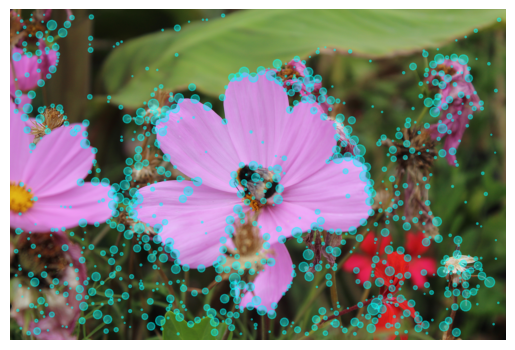
我们可以使用这些关键点来绘制图像。
import matplotlib.pyplot as plt
import torch

for i in range(len(images)):
  keypoints = outputs[i]["keypoints"]
  scores = outputs[i]["scores"]
  descriptors = outputs[i]["descriptors"]
  keypoints = outputs[i]["keypoints"].detach().numpy()
  scores = outputs[i]["scores"].detach().numpy()
  image = images[i]
  image_width, image_height = image.size

  plt.axis('off')
  plt.imshow(image)
  plt.scatter(
      keypoints[:, 0],
      keypoints[:, 1],
      s=scores * 100,
      c='cyan',
      alpha=0.4
  )
  plt.show()
下方展示了输出结果。